
Migrating Aurora Postgres Serverless v1 to v2 using CloudFormation
When migrating your Aurora Postgres Serverless from v1 to v2, AWS provides a comprehensive guide - “Migrating to Aurora Serverless v2”.
As of March 31st 2025, AWS had noted that they were going to begin automatically migrating Resource’s from v1 to v2.
This may catch some people out if they are using CloudFormation (CF), as at the time of writing this upgrade is not compatible with the v1 CF you have in source control.
After following the AWS Aurora Serverless V2 upgrade guide, even if you match your CF to what drift detection shows you, when you perform an update you will see the following error:
CloudFormation cannot update a stack when a custom-named resource requires replacing.
Rename <db cluster name> and update the stack again.
This is because some of the params that need changing, require Replacement, as opposed to Some interruptions or No interruption.
After going through this process several times, I made some notes as it was a great example of having to migrate complex Resource’s which are stored in CF. In particular, when you need to update your CF to match the newly created v2 Aurora DBCluster.
Below are my additional notes when upgrading the DBCluster from v1 to v2 and migrating the CF.
Prerequisites
While the process does an in place upgrade of the database, there are a few operational things to be aware of:
- Ensure you have the appropriate database backups
- The upgrade process creates a DB snapshot, as part of the migration process
- The default port for Aurora Postgres v1 is
5432- If not explicitly set in your CF, this has changed with v2 to port
3306, when using the newEngineMode:provisionedfor v2
- If not explicitly set in your CF, this has changed with v2 to port
- The migration process does not change the
masterdatabase password- If you are setting this using CF, dependencies may inadvertedly cause an update to it
Migrating to Aurora Serverless v2
The upgrade paths differ considerably depending on the version of the database you are using.
It’s well documented but does require careful reading.
As I’m running Postgres v13.x, the initial process is very easy and I just followed the instructions under the guide for the section: “To upgrade an Aurora Serverless v1 cluster running Aurora PostgreSQL version 13”.
Here are my additional notes to the provided guide:
- “Convert the Aurora Serverless …”
- This part of the process is variable and depending on your database size can take minutes, to hours
- “Add an Aurora Serverless v2 reader …”
- Remember to select instance type of
Serverless v2 - Instance name is globally unique
- Use the guide to match your current instance
MaxandMin
- Remember to select instance type of
- “Fail over to the Aurora Serverless …”
- When failing over there some text is displayed in the AWS Console to this occurring but it can be missed.
Watch for your newv2 serverlessinstance to become thewriter.
- When failing over there some text is displayed in the AWS Console to this occurring but it can be missed.
Updating the stack using Infrastructure Composer
Using Infrastructure Composer makes the process very easy and gives clear visibility as to exactly what CF changes you are applying. Hat tip to the guys at AWS Support, who showed me the little hack of using Infrastructure Composer to modify the CF , then store it in S3 “temporarily” for the Import Operation.
So below, when I refer to Updating the stack this method is what is implied.
Open the stack you want to modify using AWS Console -> CloudFormation and then click Update:

Select Edit in Infrastructure Composer

- Once
Infrastructure Composeropens up, you will see a visual representation of your resources - Click on “Template” button to view the CF
Resources, and toggle wether you want to view inyamlorjson- This guide assumes you are using
yaml
- This guide assumes you are using
Resolve CloudFormation stack drift with an import operation
AWS provide a guide to resolving stack drift, so you can update your CF to match that of the Resource in AWS. As part of the upgrade of Aurora Serverless from v1 to v2, you will get some stack drift.
Here are my additional notes to each section of the AWS guide:
-
“Update stack with Retain deletion policy”
Note: the following notes, help from step3in the AWS guideUpdate the stack and as per the instructions, add a
DeletionPolicyattribute and set it toRetainfor anyDBClusterresources. This ensures the existingDBClusterresources are retained rather than deleted, when we temporarily remove them from the stack in a later step.- Use
spacesnottabsfor indentation when modifying theyaml, or the validation will fail - Use the
Validatebutton and then theUpdate templatebutton, to apply the changes - When viewing the “Change set preview” you should see the retained
DBClusterresources being marked asreplacement = false
You’ll now be redirected back to the Update stack CF screen, you can now continue from step
5in the AWS guide, where we now apply the CF changes. - Use
- “Remove drifted resources, related parameters, and outputs”
-
Validate that the
DeletionPolicyhas been applied by viewing the current Template in CF:
-
Update the stack and search for all references to your
DBClusterresources and replace any dynamic values with the actual values. You can find these values on the Resources tab:
- Now comment out the
DBClusterresources from the template (Ctrl + /), we will need these again later - Use the
Validatebutton and then theUpdate templatebutton, to apply the changes
You’ll will now follow the same process as before in the AWS guide, to apply the CF changes.
Go to
AWS Console -> CloudFormation -> Eventsand you should see a Delete Skipped for theDBClusterresources you just commented out.
-
-
“Update template to match the live state of your resources”
This is where we now import theDBClusterresources and get the CF to match what AWS has.Preparing CF Resources for import
- Update the stack and uncomment all references to your
DBCluster - Replace the AWS::RDS::DBCluster
ScalingConfigurationwith the newServerlessV2ScalingConfigurationproperty and setMaxCapacityandMaxCapacity - Update the
EngineModetoprovisioned - Update the
EngineVersionto match the existing version being used in AWS- This can drift if you have the automatic minor upgrade feature turned on
- Ensure these changes are applied to your source controlled version of the
Resource’s - Use the
Validatebutton and then theUpdate templatebutton to save the CF, but do not apply them - Copy the text for the location of where the updated template is stored in S3, we will use this reference to import the resource:
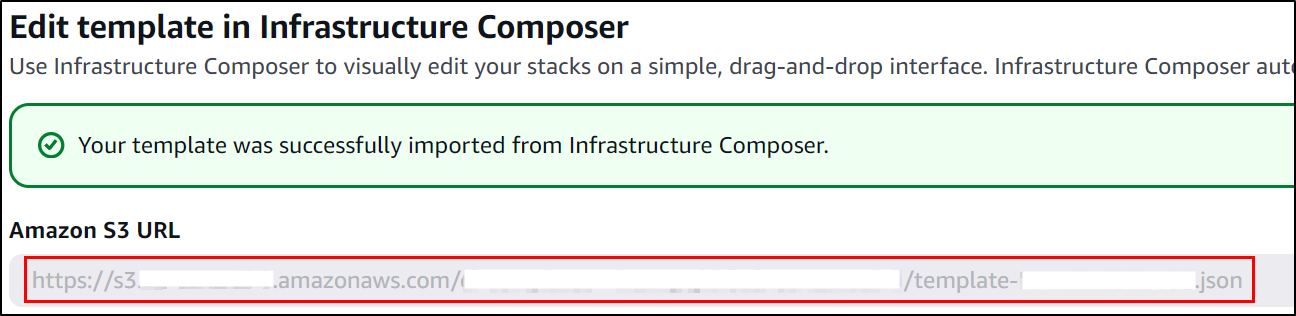
Import Resources
As per the AWS guide, follow the instructions to import using Import resources into stack menu option- Provide the S3 link we copied before, when specifying location for importing of the resources
- You’ll need to provide the current value for your
DBInstanceId. The import operation needs to match the imported resource, to the one that already exists as we don’t want to create it again - One the last page, the Changeset preview should show an Action of
Import
Once completed, you should see your
DBClusterresources marked as Imported in the CF Events tabReplace hard coded references with original CF references
Once the resources are imported successfully, update the stack and replace the references that we hard coded in step2with their original dynamic CF reference.- Use the
Validatebutton and then theUpdate templatebutton to save the CF, then apply the changes - Once completed perform a stack drift detection, and you should see no differences
- Update the stack and uncomment all references to your
-
Add a new
DBInstanceand deploy updated CF
In step 3 your source controlled CF should have been updated to match what we have now in AWS.
Add to your CF a DBInstanceResource, currently all the instances have been manually created.We can now run the deployment pipeline, to deploy our updated CF and prove what is in source control and in AWS are now in sync. As the CF now matches the
Resourcein AWS, you should receive no errors. - Remove manually created additional instances
As part of the Migrating to Aurora Serverless v2 upgrade process, some additional instances would have been created. Before removing any, ensure you have failed over to the new instance created by the CF in step4.
Your Aurora Serverless v1 is now migrated to v2 and your CloudFormation should now match this upgrade.
Feedback on this guide is welcome.
References:
AWS - Aurora Serverless-v2 Upgrade
AWS - Detect Stack Drift
AWS - Resolve Stack Drift
AWS::RDS::DBCluster
AWS::RDS::DBInstance